
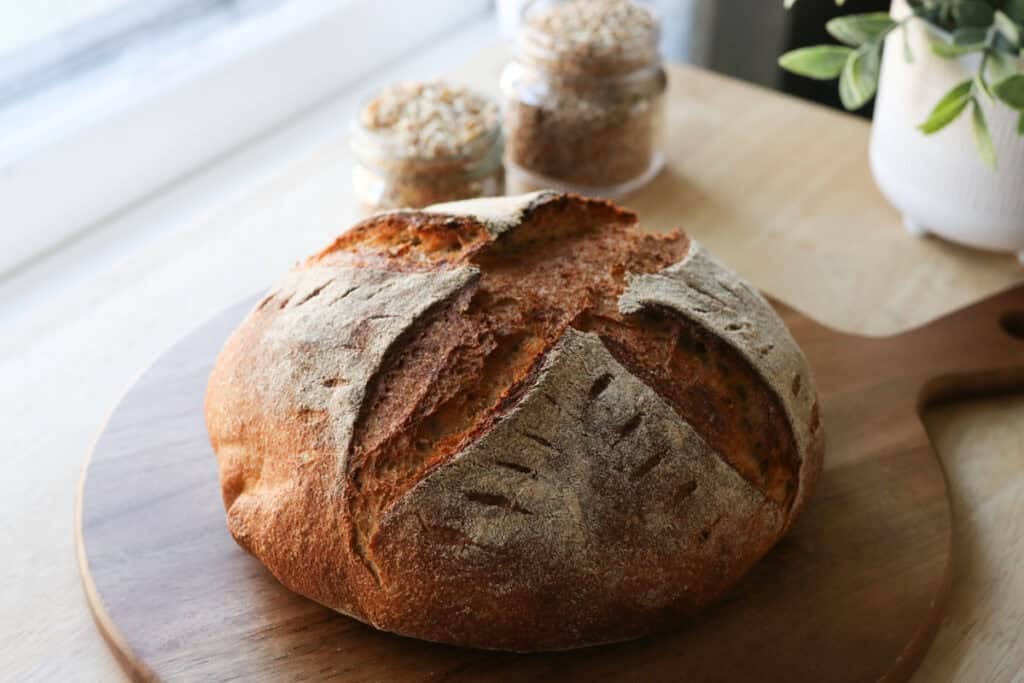
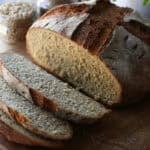
The Best Artisan Loaf with Freshly Milled Flour
This post may contain affiliate links. Please read our Disclosure Policy.
Imagine the warm, comforting aroma of freshly baked bread filling your kitchen, wrapping around you like a cozy blanket. This artisan loaf made with freshly milled flour elevates your baking game in ways you might not expect, even if you’re just starting out. There’s something deeply satisfying about using flour that’s been milled moments before—it adds a depth of flavor and texture that’s simply magical. Whether this is your first time making bread or you’re revisiting the charm of homemade bread, this is a great recipe that invites you to slow down and savor each bite.
What Makes This Recipe Great
Rich, fresh flavor from fresh milled flour.
Using fresh flour that you mill yourself means you get every bit of natural goodness and that slightly nutty, complex taste that grocery store flour just can’t match. It’s like the difference between a casual chat and a meaningful conversation—this bread has character.
Simple ingredients, extraordinary results.
This recipe keeps things straightforward with pantry staples, but the magic happens in the technique and freshness. It’s a great way to boost your confidence without feeling overwhelmed by long ingredient lists or fancy gadgets.
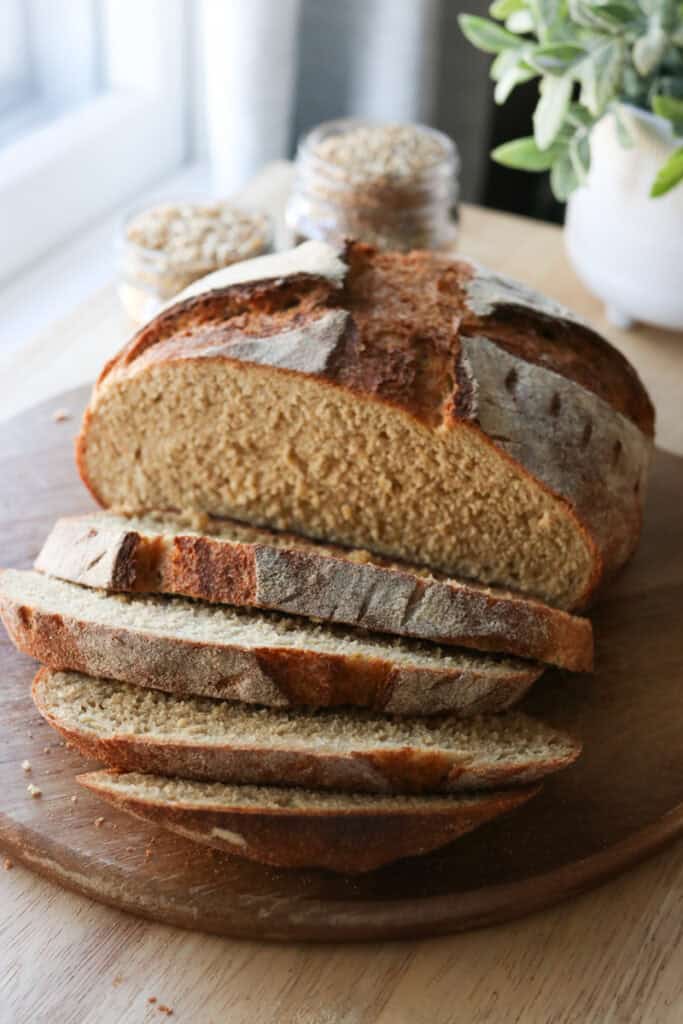
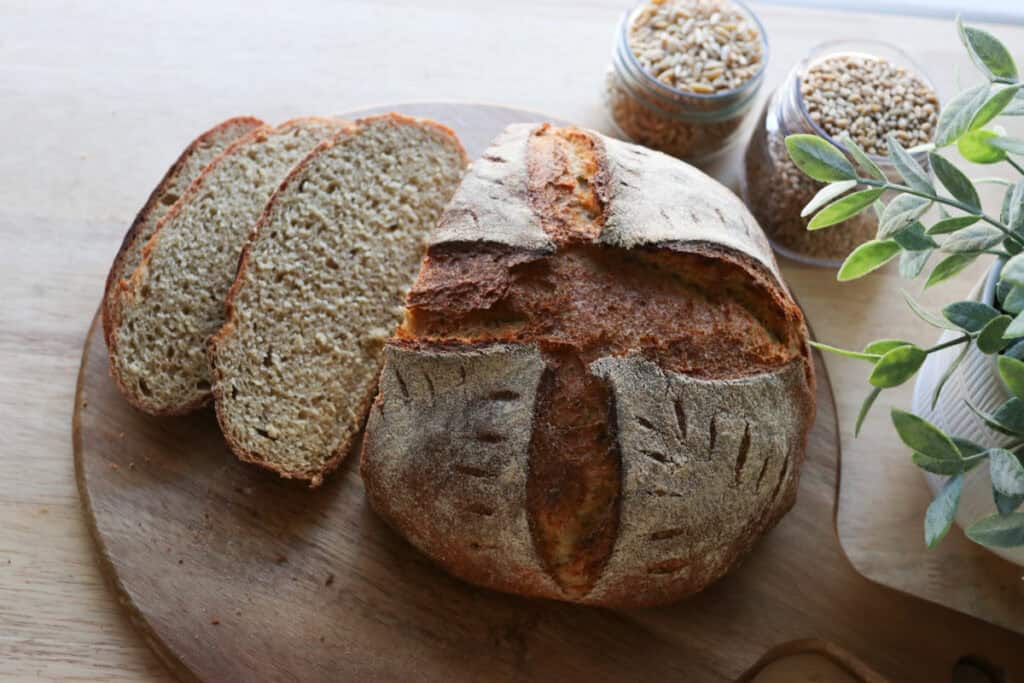
A delightful crust with an open, airy crumb.
The loaf bakes up with a perfect crust that’s crusty without being tough. That balance is what makes artisan bread so special, making each slice a little piece of happiness.
For more fresh milled recipes, try these bread bowls or these fluffy English muffins!
Overview of Ingredients
Freshly Milled Flour
This is the star of the show, giving this delicious bread loaf rustic, wholesome flavor packed with nutrients. If you don’t have a grain mill, you can substitute with high-quality whole wheat flour or all purpose flour. However, store-bought flour will produce a different taste and texture and you will lose the health benefits.
Water
Water hydrates the flour and activates the yeast, essential for that lovely loaf rise. Use filtered or spring water if your tap water is heavily chlorinated—yeast can be a bit sensitive, and you want it to feel right at home.
Yeast
Instant yeast helps your bread rise and gives it that nice airy texture.
Salt
Salt not only seasons the bread but also controls yeast activity and strengthens gluten.
Optional Add-ins
Feel free to jazz up your bread with herbs, seeds, or nuts. Sunflower seeds or rosemary can make the loaf extra special, but keep additions moderate so they don’t weigh down the dough.
Tips for Success
#1 Let the dough rest
Giving your dough enough resting time after mixing gives the best results and allows the flour to fully hydrate and the gluten to develop naturally. This rest period is crucial for that chewy, elastic texture and better flavor development.
#2 Use a Dutch oven for baking
Baking your bread inside a preheated, hot Dutch oven traps steam, which helps create a crisp, golden brown crust and a better oven spring. This little trick mimics professional bread ovens and makes home baking feel very fancy without extra fuss.
#3 Be patient with fermentation
The fermentation process enhances flavor and texture dramatically. Don’t rush it; your taste buds will thank you for letting the yeast work its magic at a gentle pace.
#4 Score the dough properly
Making shallow cuts in the dough before baking helps control how the bread expands in the oven. Good scoring means pretty bread and prevents unwanted ruptures in the crust.
Helpful Tools & Supplies
Whether you’re just dipping your toes into the world of fresh milled flour or you’re a seasoned home baker, I’ve taken the guesswork out of what you truly need. All of these tools and resources are available in my shop, designed to help your journey be smooth and nourishing:
Grain Mills
- NutriMill Classic Grain Mill – My go-to for fine, consistent milling; perfect for sandwich breads and everyday baking.
- NutriMill Harvest Grain Mill – Stone-ground elegance: this model delivers whole-grain flavor with a beautiful appearance.
Mixers
- Ankarsrum Mixer – A powerhouse kitchen companion with multiple speeds and attachments—ideal for kneading bread dough effortlessly.
Baking & Bread Tools
- Bread Bow Knife – Artisan-made with a high-carbon steel blade and cherry wood handle—this knife slices loaves with ease.
- Sourdough Essentials Kit With Starter – Complete starter kit that includes dehydrated sourdough starter, banneton baskets, a dough whisk, scoring lame, and more.
Cookbooks & eBook Bundles
- Everyday Whole Grains Vol. 1 & 2 (printed & digital) – Packed with 70+ recipes built around fresh milled flour, from breads to snacks and desserts.
- The Fresh Breads Bundle – A comprehensive set including eBooks like The Perfect Loaf, the Cookie Jar, bulk baking guides, and a sourdough mini‑course—all centered on fresh milled flour.
- Freshly Milled Made Simple Guide – A video-based guide that walks you through milling and baking basics, making the process feel easy and approachable.
Specialty Items
- Dehydrated Sourdough Starter – Just add water and flour to rehydrate this starter—perfect for bakers without an active sourdough culture.
- I Knead Fresh Flour Mug – A charming, handmade 12 oz ceramic mug—great for coffee breaks during dough rising!
Why These Are Worth It
Every tool in this collection has been personally vetted to support you in baking with fresh milled flour. From the grain mills that make your flour, to mixers that knead dough, to resources that teach you every step—it’s all here to make sure your homemade bread journey is joyful, nourishing, and successful.
➡️ Explore all of these items and more in the Generation Acres Farm Shop — your one-stop spot for fresh milled flour baking essentials.

Equipment:
Danish dough whisk or hook
Mixing Bowl
Dutch Oven or Baking Stone with Lid
Kitchen Scale (for accurate measurements)
Sharp Knife or Razor Blade for scoring
Bench Scraper
How to Make the Best Freshly Milled Artisan Loaf
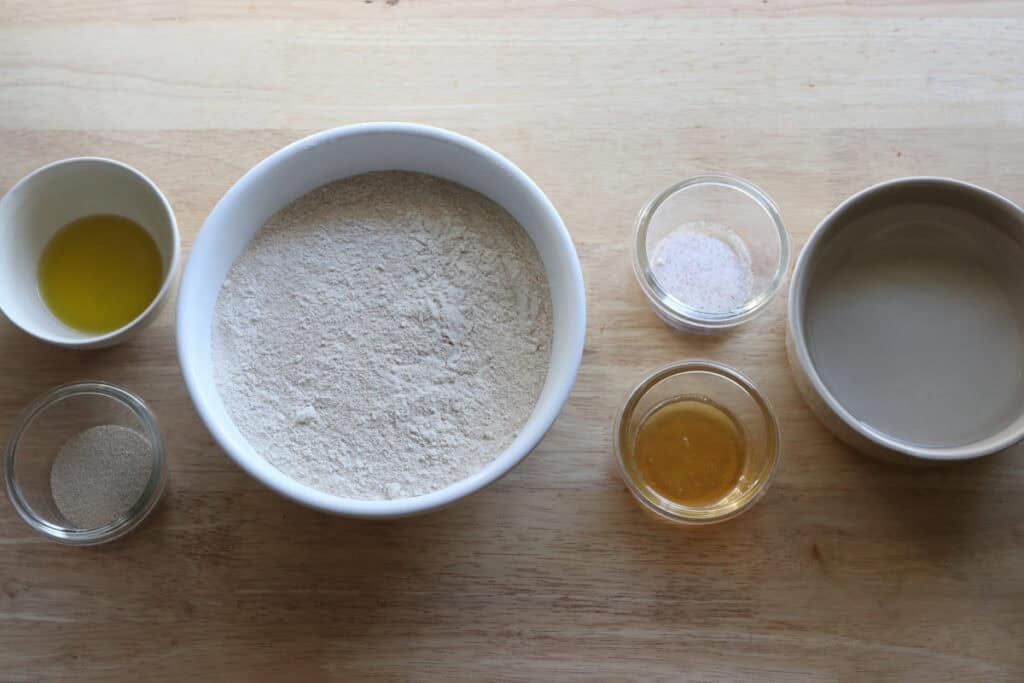
Ingredients:
- 1 ¾ cup plus 2 tablespoons warm water (407 grams)
- 2 tablespoons olive oil
- 3 tablespoons honey
- 4 cups freshly milled hard white wheat flour, finely milled (520 grams)
- 1 tablespoon instant yeast
- 2 ½ teaspoons salt
Directions:
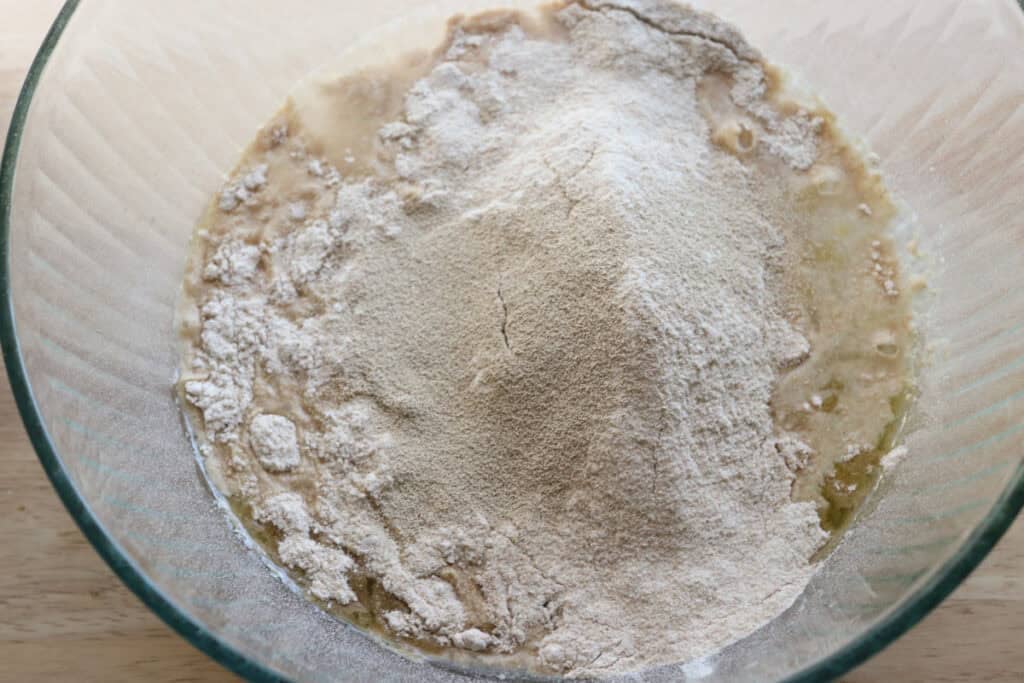
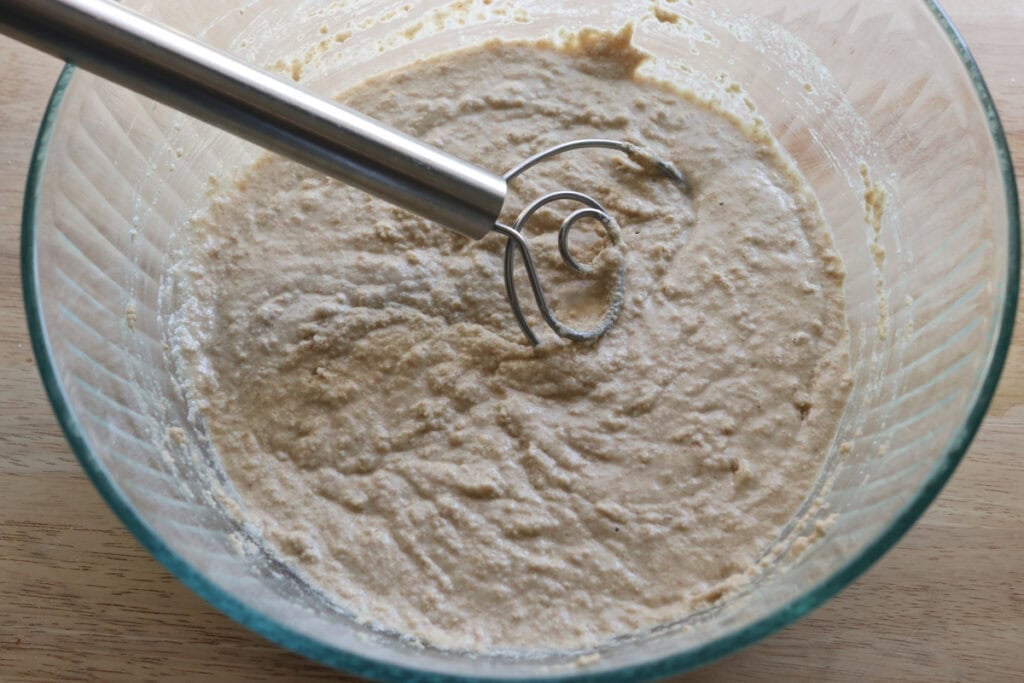
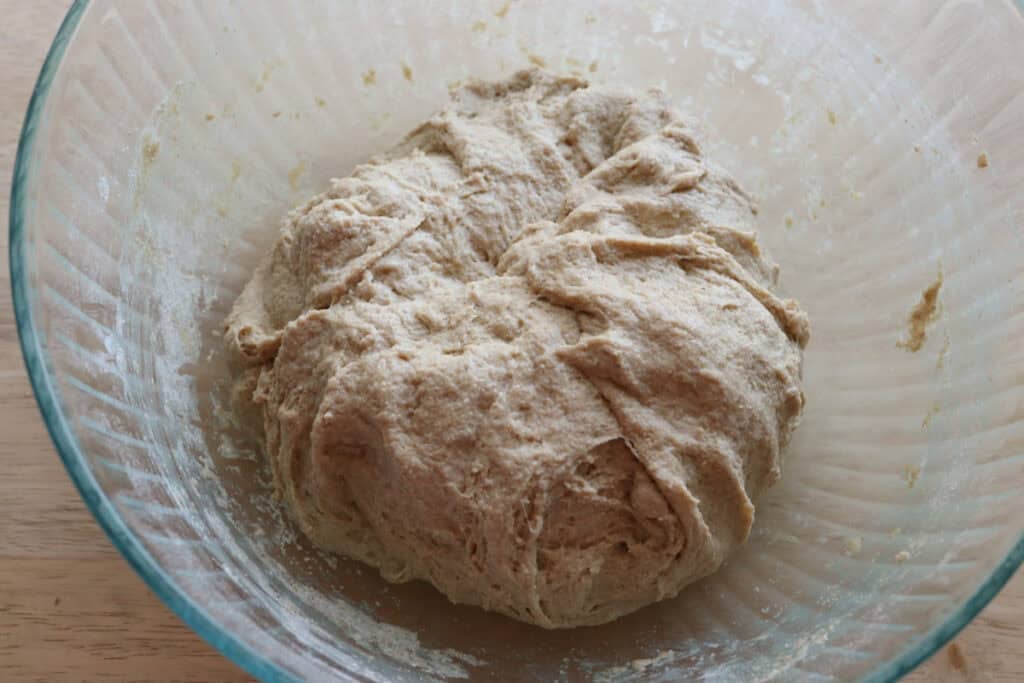
- In a large bowl, combine the water, oil, honey, half of the flour, and yeast. Mix well and allow to sit for 30 minutes until bubbly.
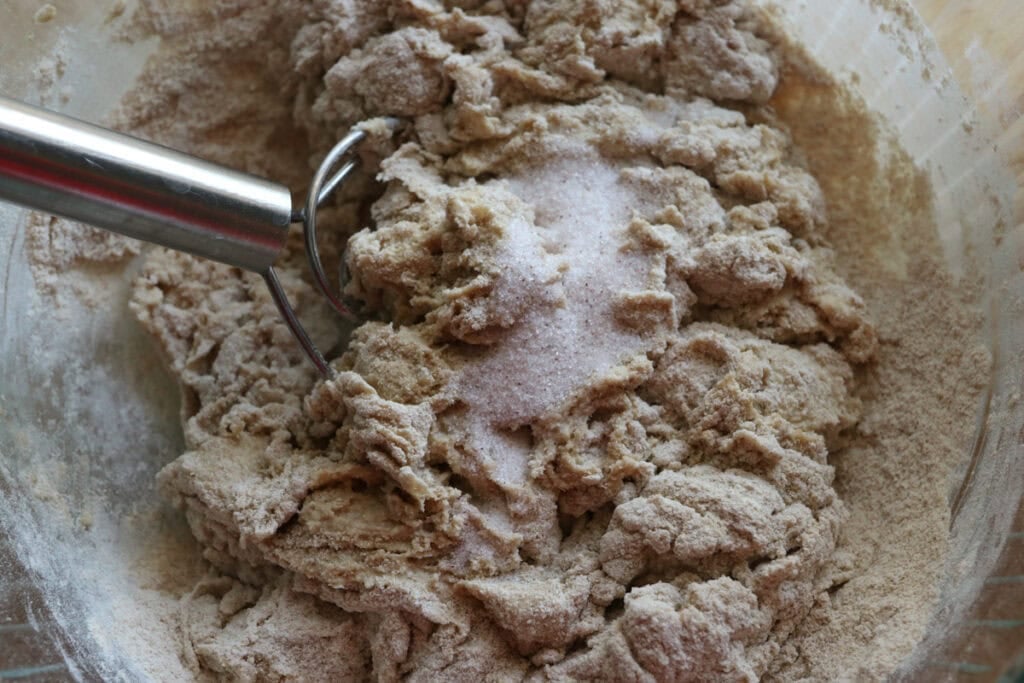
- Once it’s bubbly, add the remaining flour and salt. Cover and let rest for 15 minutes.
- Once rested, perform a series of stretch and folds. Do this by grabbing one piece of the dough and pull it up and over the rest of the dough. Repeat this as you rotate the bowl to stretch and fold all of the dough. Repeat this 3-4 times, until the dough starts to come together.
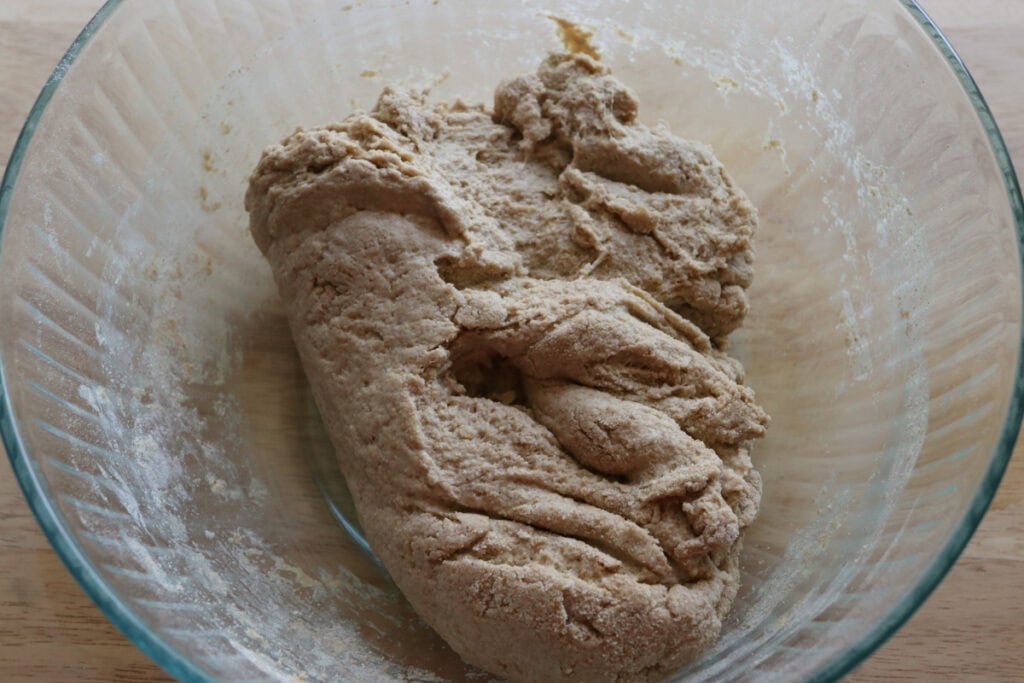
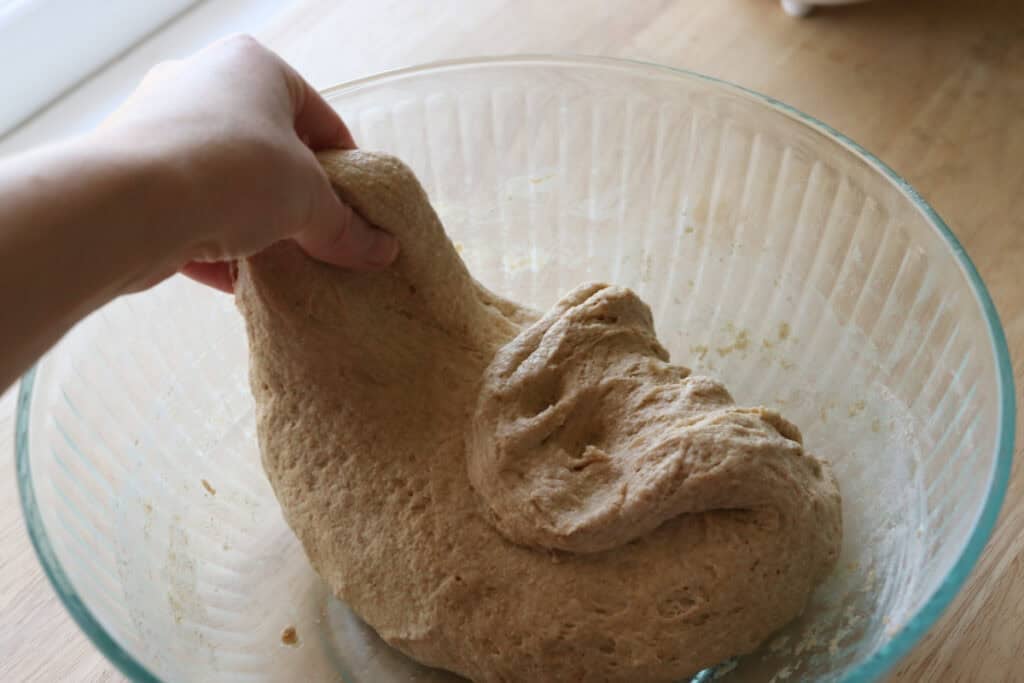

- Cover and rest for 15 minutes, then do a couple of stretch and folds a second time until the dough comes together even more.
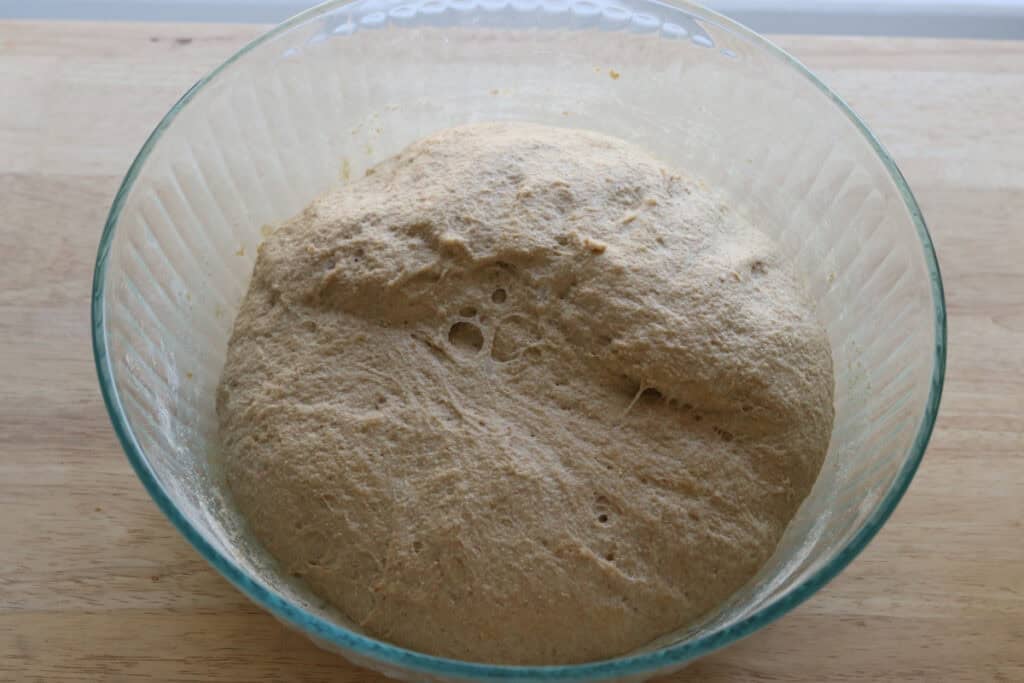
- Cover and let dough rise for 1 ½ hours, until doubled in size.
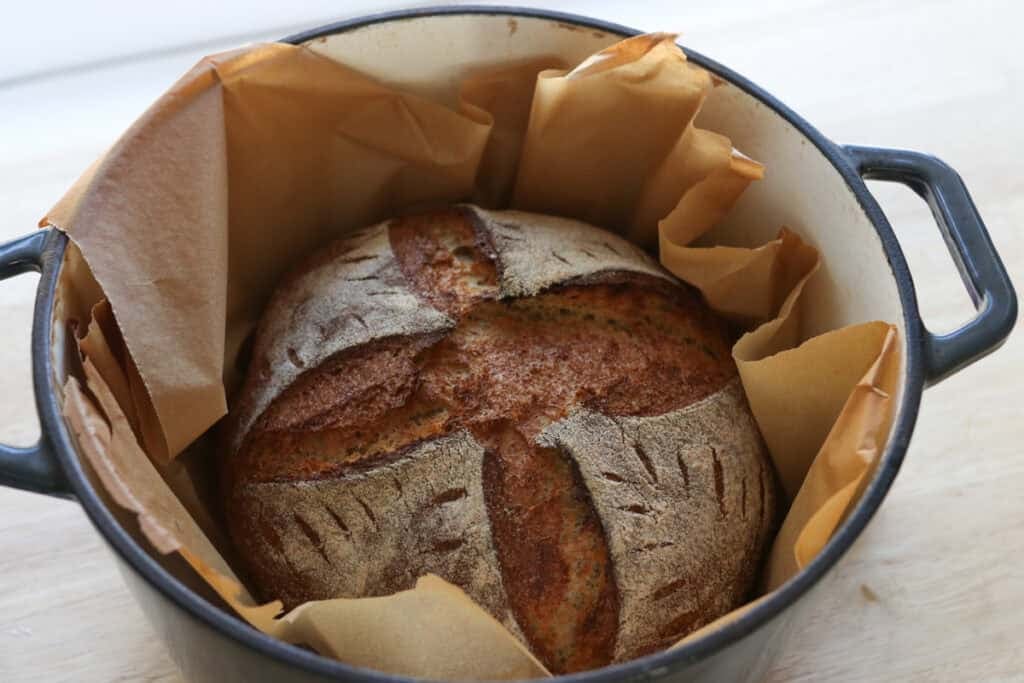
- Preheat the oven to 480 degrees F. and place a dutch oven with the lid on inside.
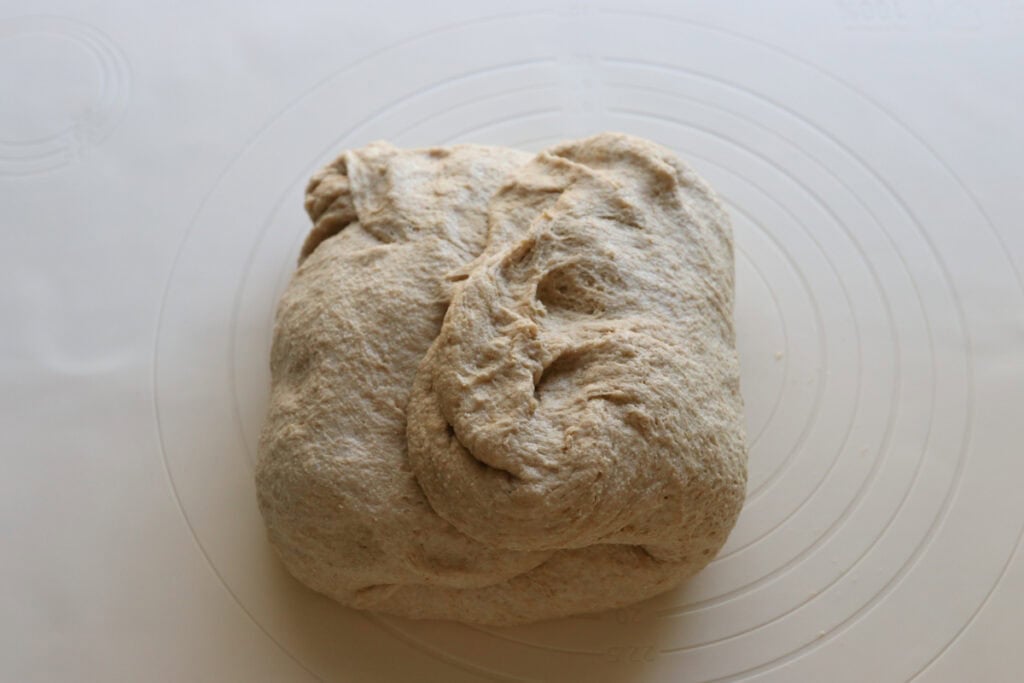
- Turn the dough out onto a lightly floured surface and shape the dough into a smooth ball. Pull the dough up and over itself on the sides and create a small rectangle. Then, flip the dough over, cup it and pull it down toward you. Continue rotating, cupping, and pulling the dough until a smooth ball is formed.
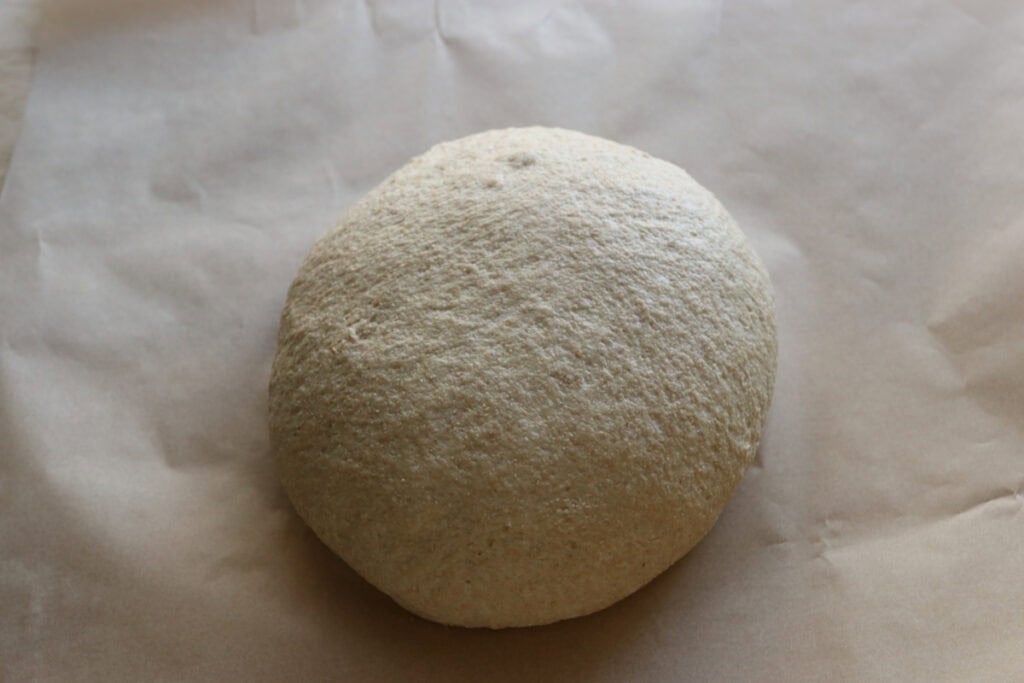
- Place on a piece of parchment paper, then cover it and let rest for 30 minutes.
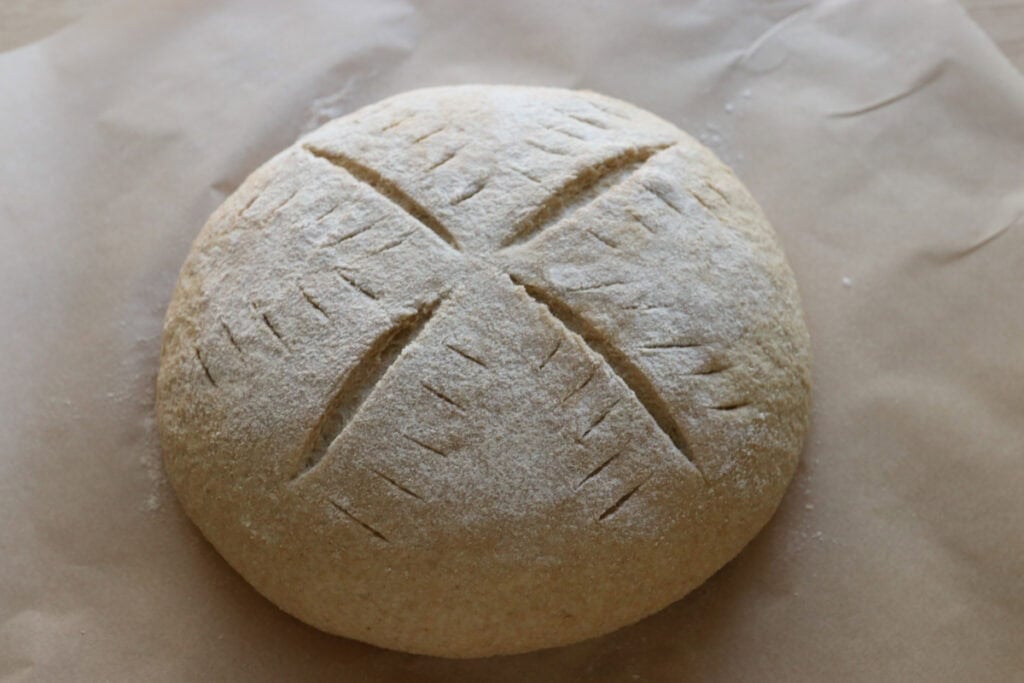
- Dust the top of the dough with some flour, then score as desired.
- Place in the dutch oven to cook for 22 minutes with the lid on. Then, remove the lid and cook for another 4-6 minutes, until the internal temperature reaches about 200 degrees F.
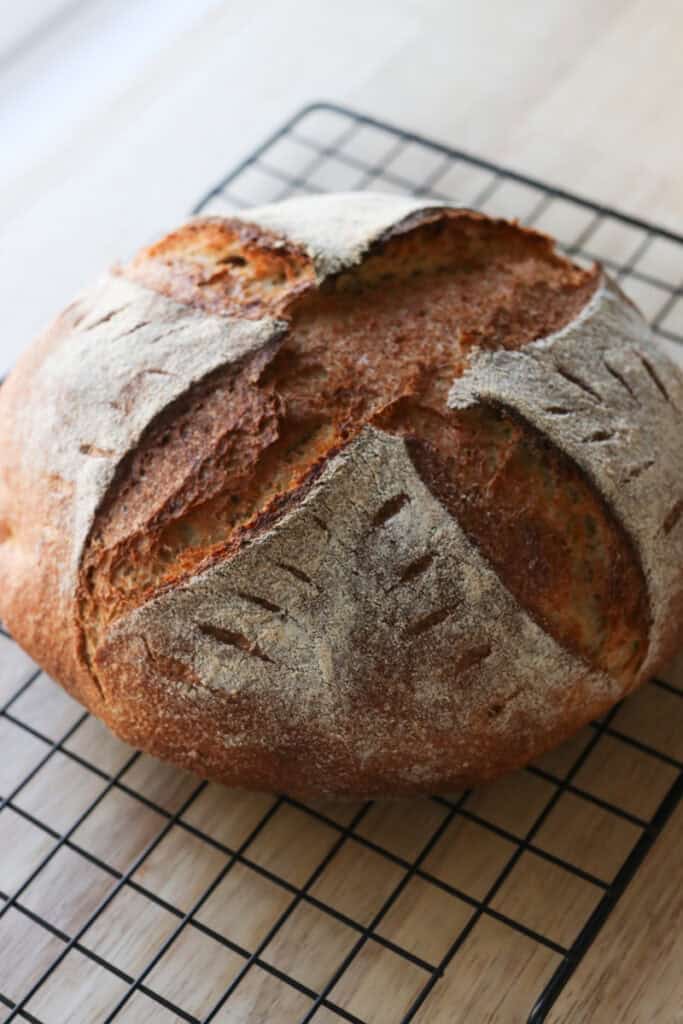
- Let cool on a wire rack before slicing.
Recipe Variations
Seeded Crunch: Add pumpkin, sesame, or flax seeds to the dough or on top for extra texture and a nutritional boost.
Herb Infusion: Mix fresh or dried herbs like rosemary, thyme, or oregano into the dough for an aromatic loaf.
Gluten-Free Version: Use a gluten-free baking blend and xanthan gum as a binder; just know the texture will be different but still delicious.
Troubleshooting Common Problems with this Recipe
Dense or Heavy Loaf
If your bread turns out dense, it could be due to under-kneading or not enough fermentation time. Make sure to knead until the dough is smooth and elastic, and give it plenty of time to rise and develop flavor.
Crust Too Hard or Thick
A very thick crust can be caused by baking too long or at too high a temperature without steam. Try using a Dutch oven, misting the oven, and reducing bake time slightly to get a thinner, crisp crust.
Loaf Didn’t Rise Enough
Yeast activity might be the culprit—check your yeast’s freshness You may need to keep your day in a warm place so that it rises better as well.
Bread Tastes Bland
If your bread lacks flavor, salt might be the missing element. Salt enhances taste and controls fermentation, so don’t skip or reduce it too much.
Crumb Is Too Tight or Gummy
This can happen if there’s too much flour or not enough hydration in the dough. Weigh your ingredients carefully and don’t add extra flour during kneading unless necessary.
Freezing & Storing Leftovers
Freezing:
Cool your artisan loaf completely before wrapping it tightly in plastic wrap or placing in a plastic bag. Freeze for up to 3 months. When ready to enjoy, thaw at room temperature and warm it in the oven for a few minutes to revive the crust.
Storing:
Store leftover bread in a paper bag or a bread box at room temperature to keep the crust crisp and the inside soft. Avoid plastic bags unless you want your crust to turn chewy quickly. Bread is best eaten within 2-3 days.
Extra FAQs
What’s the best flour to use for artisan bread?
Freshly milled hard white wheat flour works best due to its higher protein content, which helps develop gluten and gives the bread structure.
How long does the dough need to proof?
It typically needs 1 to 2 hours at room temperature for the first rise, followed by a shorter rest after shaping.
Is it necessary to use a Dutch oven?
While not absolutely necessary, a Dutch oven or covered baking vessel creates steam that creates that perfect crusty loaf. If you don’t have one, place a pan of water in your oven to add moisture.
Can I bake this loaf in a regular oven without a lid?
Yes, but adding steam (via a pan of water or misting the oven) is key to getting that artisan crust. Also, consider placing the loaf on a preheated baking stone for better heat distribution.
The Best Artisan Loaf with Freshly Milled Flour
Ingredients
- 1 ¾ cup plus 2 tablespoons warm water 407 grams
- 2 tablespoons olive oil
- 3 tablespoons honey
- 4 cups freshly milled hard white wheat flour finely milled (520 grams)
- 1 tablespoon instant yeast
- 2 ½ teaspoons salt
Instructions
- In a large bowl, combine the water, oil, honey, half of the flour, and yeast. Mix well and allow to sit for 30 minutes until bubbly.
- Once it’s bubbly, add the remaining flour and salt. Cover and let rest for 15 minutes.
- Once rested, perform a series of stretch and folds. Do this by grabbing one piece of the dough and pull it up and over the rest of the dough. Repeat this as you rotate the bowl to stretch and fold all of the dough. Repeat this 3-4 times, until the dough starts to come together.
- Cover and rest for 15 minutes, then do a couple of stretch and folds a second time until the dough comes together even more.
- Cover and let dough rise for 1 ½ hours, until doubled in size.
- Preheat the oven to 480 degrees F. and place a dutch oven with the lid on inside.
- Turn the dough out onto a lightly floured surface and shape the dough into a smooth ball. Pull the dough up and over itself on the sides and create a small rectangle. Then, flip the dough over, cup it and pull it down toward you. Continue rotating, cupping, and pulling the dough until a smooth ball is formed.
- Place on a piece of parchment paper, then cover it and let rest for 30 minutes.
- Dust the top of the dough with some flour, then score as desired.
- Place in the dutch oven to cook for 22 minutes with the lid on. Then, remove the lid and cook for another 4-6 minutes, until the internal temperature reaches about 200 degrees F.
- Let cool on a wire rack before slicing.
Nutrition


The best recipe!! Thank you, so I glad I found your page.
Can I substitute maple syrup for the honey? ty!
I don’t see why not!
Could this be placed in a loaf pan and baked as well?! How would you do the temperature and timing? Would you still cover/dome with another loaf pan initially?
I loved it in the Dutch oven, but sandwich shaped loaves are best for my family, I’m just curious. Thanks!
Just use my sourdough sandwich bread recipe if you prefer sandwich style bread 🙂
Could I omit the honey? Or use way less? We prefer less sweet bread.
This turned out so great though and directions were really helpful
Sure!
Made this twice so far and it’s great! It’s a nice alternative when I don’t have time for a sourdough loaf, but don’t want sandwich bread. Do you think it would translate to rolls ok? Forming the dough into small rolls into a boule at the shaping point?
I don’t think it would do well in roll form, honestly
I have made this twice now, and each time the bottom burns before it is completely done. Wish I new what is causing this.
This is an oven or dutch oven issue – not a recipe issue.
Debbie, try putting rice in the bottom of your Dutch oven or a sheet pan on the bottom rack. I used to have this problem too!
I always put down about 1/2 cup to 3/4 cup of uncooked rice in the bottom of my Dutch oven to prevent the bottoms of my loaves from burning.
Can I use stand mixer?
I haven’t tried that, so I’m not sure how it would do.
Can I put this in the fridge overnight to rise instead of the 1 1/2 hours on countertop?
I have never tried that, so I can’t say for sure